When a check box contains a check mark, it means the option/information has been selected. To mark a check box, click on it. To deselect the option/information by removing a check mark, simply click on the box again.
Here's your basic guide to entering, sorting, saving, and viewing information.
Note: For tips on navigation or ways to find information within this help system, please look at How to Use This Help System.
When a check box contains a check mark, it means the option/information has been selected. To mark a check box, click on it. To deselect the option/information by removing a check mark, simply click on the box again.
The State you select determines the list of city names that displays in the City field. The system tries to narrow each list of choices to save you time. If a city belongs to more than one county (like Chicago, for instance), the system also provides a list of County Qualifiers to choose from. Please pay attention to your spelling and to the resulting field entry. Available Loads uses MileMaker abbreviations, and you want to be sure the city you intended is the one that displays. For a list of MileMaker abbreviations, click on Info in LandstarOnline's main menu bar, then on General Reference, and then on the link to the MileMaker Abbreviations - General Abbreviations document.
State or City, State field:
The Country you select limits the loads that are returned in your search. The "All" selection allows all loads, whether in the United States or Canada to be returned. If Canada is selected, only (Origin) loads in or (Destination) loads to Canada are returned. If the United States is selected, only loads within the United States are listed.
The date field is a list that allows you to choose dates. The dates displayed are 10 days prior and 10 days after the current date.
A default setting is a selection or option that Available Loads uses automatically unless you change it. Default settings continue to display in fields after the screen has been reset and all entries or changes you've made have been discarded.
When you see a drop-down arrow  to the right of an entry field, it indicates that a list of choices is available. Click on the arrow to open the list. You may need to scroll to see all the choices. Click on the one you want to select. If you know the correct spelling, you can type the content into the field.
If you try to move forward from a screen without filling in required fields, Available Loads prompts you to complete the necessary information. An error message identifies the items that need your attention. Add the required information and click the desired button again to move the process forward.
When you see a double drop-down arrow ![]() , it indicates that more information is available. Click on the arrow to display the list. If you want to hide the list again, click again; it's a toggle feature and the double arrows change direction to
, it indicates that more information is available. Click on the arrow to display the list. If you want to hide the list again, click again; it's a toggle feature and the double arrows change direction to ![]() when the list is open.
when the list is open.
The option to narrow lists is located in column headings. When you see a filter  in a column heading on the Saved Search List screen you can click it to display the filtering options.
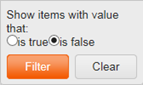
There are three types of filtering options on the Saved Search List; the true/false, calendar, and the wild card filters.
If the column has options that can be selected or deselected, such as the Default column, a true/false filter displays when you click the button for that column (see the image below).
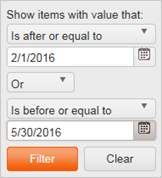
If the column has date/time options, such as the Expires column, a calendar filter displays when you click the button for that column (see the image below).
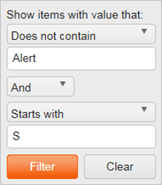
If the column has result items that came from a text-entry, such as the Name column, a wild card filter displays when you click the button for that column (see the image below).
To move forward or back in the Available Loads application, you must use your browser navigation buttons.
To move forward or back within the Available Loads screen, you must use the application navigation buttons. If there is one page of results the below options are inactive.
 button enables you to return to the first page of results.
 button enables you to return to the previous page of results.
 button enables you to move forward one page in the results.
 button enables you to move forward to the last page of results.
 button enables you to move to a specific page of results.
When you see a Refresh  button, click it to update the results in your list.
The minimum supported screen resolution for Available Loads is a setting of 1024 x 768 pixels. The recommended screen resolution is 1280 x 1024 pixels.
When column headings are underlined or contain a list of results, they are active links that can be clicked to rearrange data from ascending order (A to Z, or 1, 2, 3 with the lowest value at the top of the list) to descending order (Z to A, or 3, 2, 1 with the highest value at the top of the list). Once you click a heading, a small triangular arrow displays next to the column header that enables you to control the sort order for the screen; the arrow points up ![]() if the information in the column is sorted in increasing order, or down
if the information in the column is sorted in increasing order, or down  if it is sorted in decreasing order (these are commonly seen on search results). You can click on some columns with two labels, either label is an active link that sorts the column. This is true for the Origin/Destination column on the Available Loads Results screen, for example. You can sort the information presented by Origin or by Destination.
Click in an empty field and type a letter, number, or special character. On some screens, the system assists you by displaying a selection list at this point, such as a list of city names. You may then select a city name from the list by clicking on it. If no list displays, or if you prefer to finish the entry yourself, simply continue to type into the field. The system tries to assist you whenever possible by supplying information as you start typing.
Revised August 2016